Ultimate Guide to Inventory Source
Chapter 6: Order Manager

How to Manage Orders
Check out these Order Manager explainer videos to see this feature in action.
The Order Manager is a pivotal feature of the Inventory Source platform, superseded only by our Inventory Automation.
The Order Manager:
- Lists your orders
- Shows the current status of the orders
- Lists the SKUs associated with the orders
- Lists the tracking information for the orders
- Generates a PO for the orders
- Allows you to see the timeline of the order’s fulfillment
- Shows any potential errors associated with an order’s fulfillment
These 7 things all come together to save you a huge amount of time when processing your orders. Without this feature, you must manually submit your orders to your suppliers, which is a laborious and tedious task. The Order Manager is broken up into 3 major sections:
“Orders” – where the orders are managed
“Channels” – where the platform connections are managed
“Suppliers” – where the supplier configurations are managed
Orders
The Orders section is where you will spend the vast majority of your time in this tool.
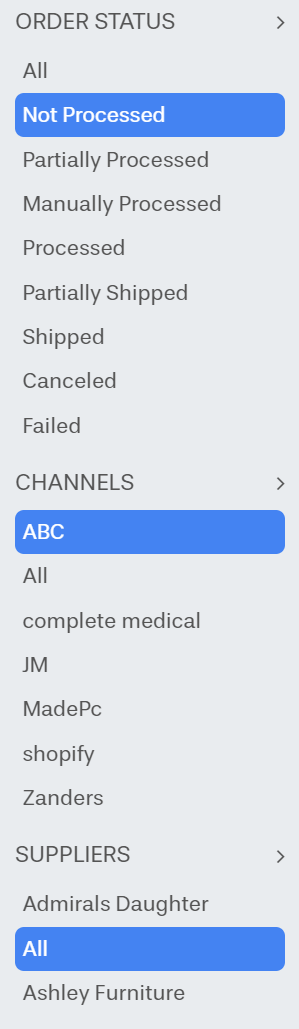
On the left-hand side of the order manager are three different sections. Listed as “Order Status”, “Channels”, and “Suppliers”.
Each section dictates a different way to filter out the orders currently in the Order Manager. For example, in the screenshot to the left you can see that, “Not Processed” is highlighted, “ABC” is highlighted, and “All” is highlighted.
This equates to showing orders that have not been processed, have been sent from the platform “ABC” and belong to any supplier. This is important because you may only want to see Processed orders from one of your stores from one of your suppliers.
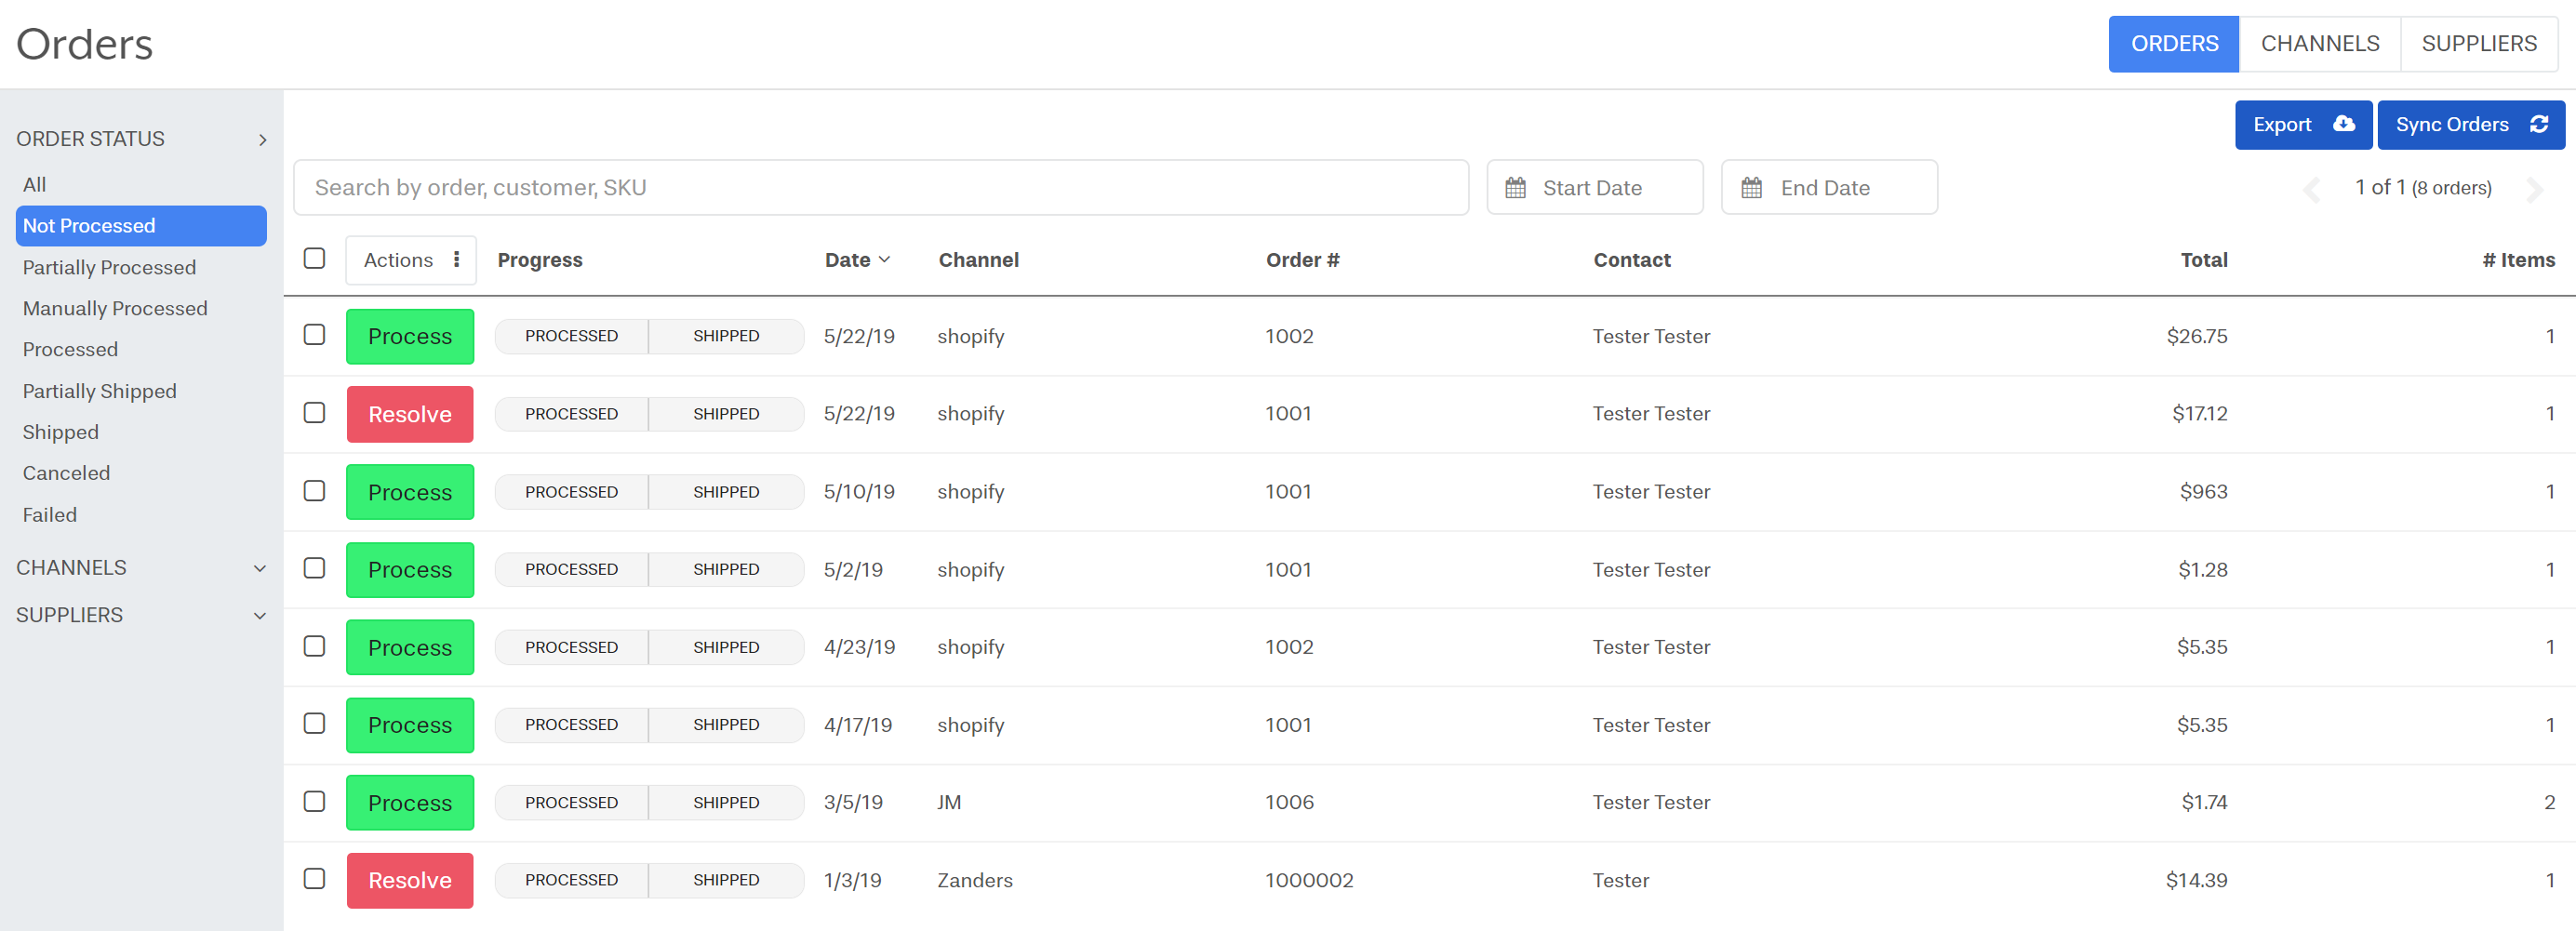
Below, we can see an example of what an unfiltered Order Manager might look like. It combines different channels, order statuses, and suppliers. This screen will show what orders are ready to process, from what website, and which customer placed the order.
The red “Resolve” button, shows an order that is experiencing an error, while the green “Process” button shows an order that is ready to be processed and sent to the supplier. Auto-processing orders is possible, and we will handle that in a moment.

So let’s say I want to see what my order looks like in the Order Manager.
Clicking on an individual order will bring up a screen like the one below. It will list every detail of that customer’s order.
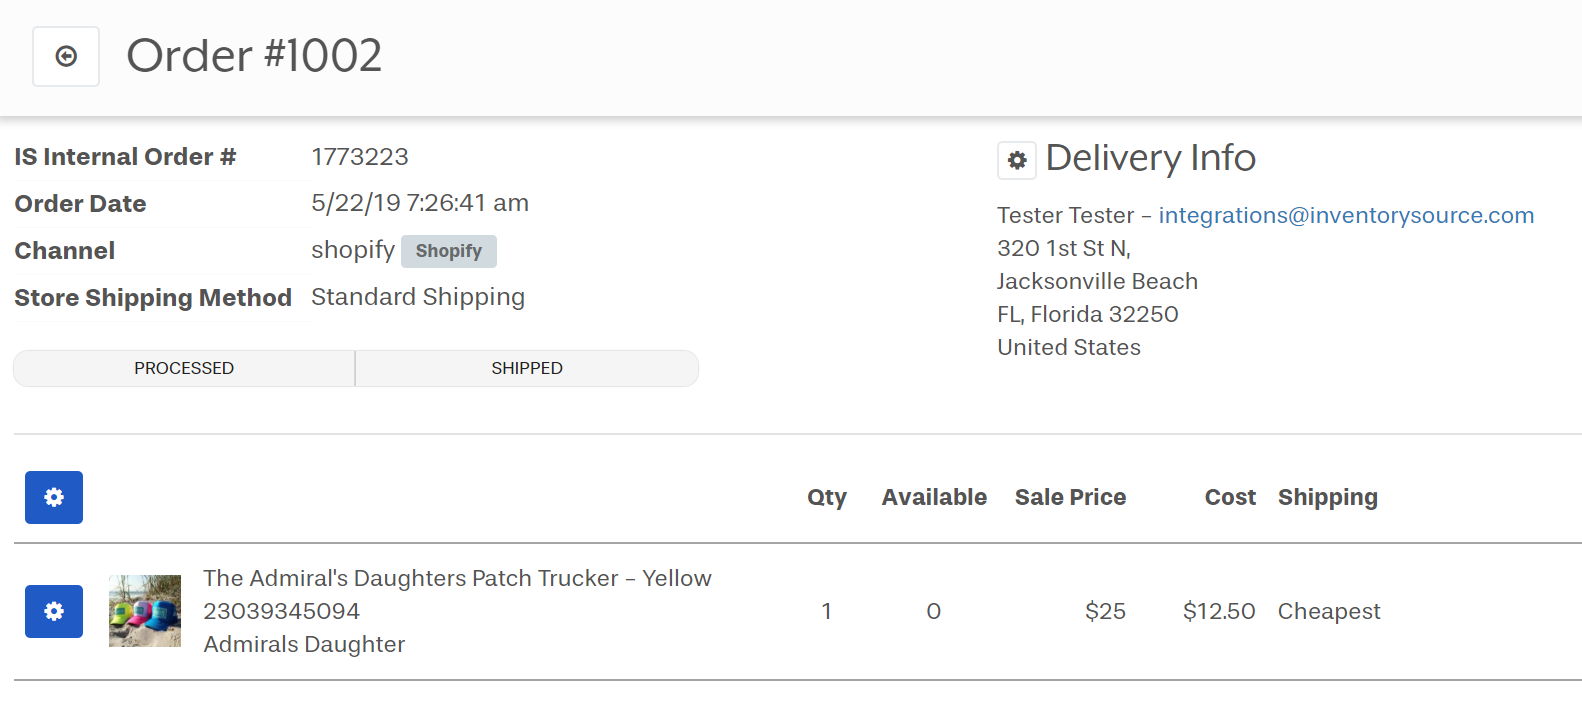
At the top, the order number is displayed, this order number is relational only your Order Manager, it does not carry over to any other account. Beneath that is our internal IS order number.
Moving down we see the date the order was placed, the channel the order was placed on, Amazon/ Shopify/Ebay, for example, and how that order is set to be delivered. The “Standard Shipping” is the order method that your potential customer has selected. You may see a “two day expedited shipping” or a “UPS Ground”.
The Store Shipping Method is based on what options are available on the supplier’s website, and how your customer has decided to receive his or her package.
Off to the right of the image, we see the delivery information; in this case, it’s test information, but it’s an apt example of what a vendor would see when reviewing an order.
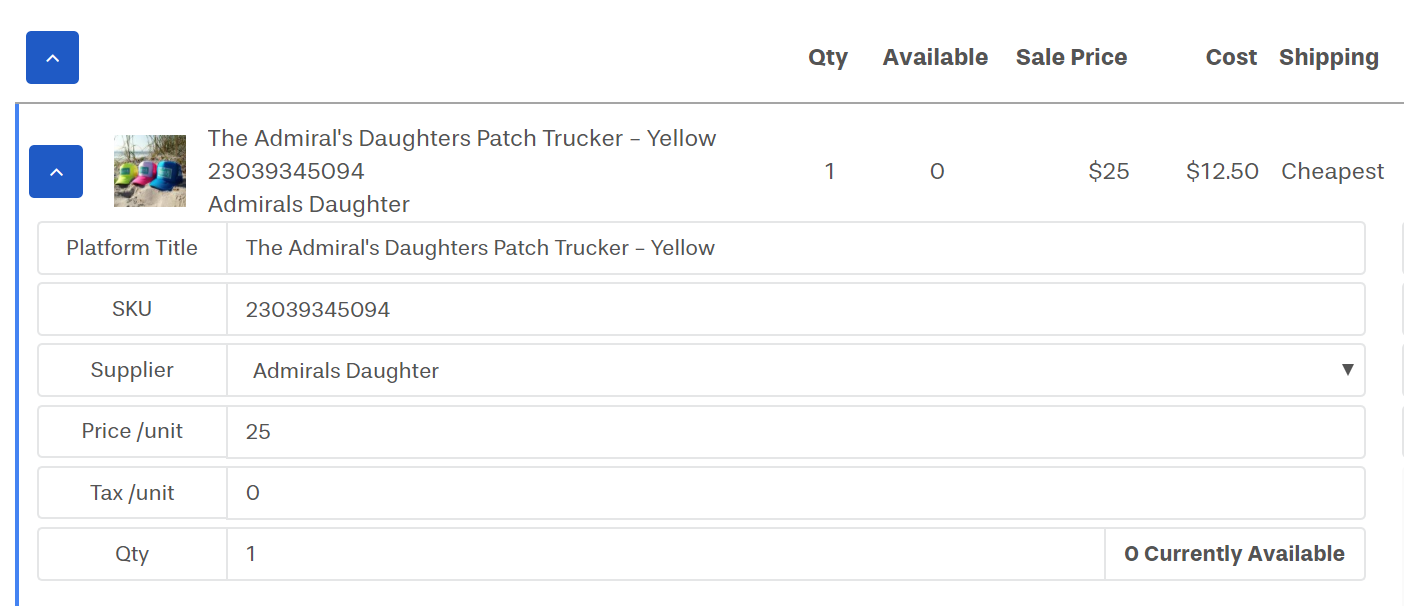
Beneath all of this, is the actual ordered product. Clicking the gear will show the breakdown of that individual product. The customer, Tester Tester, has ordered 1 unit of SKU 23039345094. The sale price is $25, the wholesale cost for the supplier is $12.50 and there is no available tax information. Unfortunately, there is no stock available for this product, indicated by the 0 underneath “Available”. When this happens, a red “Resolve” button will appear next to the order.
The “Resolve” button can appear for multiple reasons, some of the most common are:
- Shipping Mapping hasn’t been configured
- The delivery/billing information is incorrect
- The credentials to send the order to the supplier are incorrect.
- The product is out of stock.
These errors can be solved in the other two sections of the Order Manager.

Channels
Most of these setting changes will be enacted through the “Channels” section of the Order Manager.
The Channels tab will allow you to alter the data we are sending and receiving from a specific integration platform. For example, you may have 3 suppliers all attached to Amazon. However, there will be only 1 Amazon “channel” that all of these orders are processed through.
When the Channels tab is selected, all of the available channels are displayed.
Clicking the blue gear icon will take you into more advanced options.
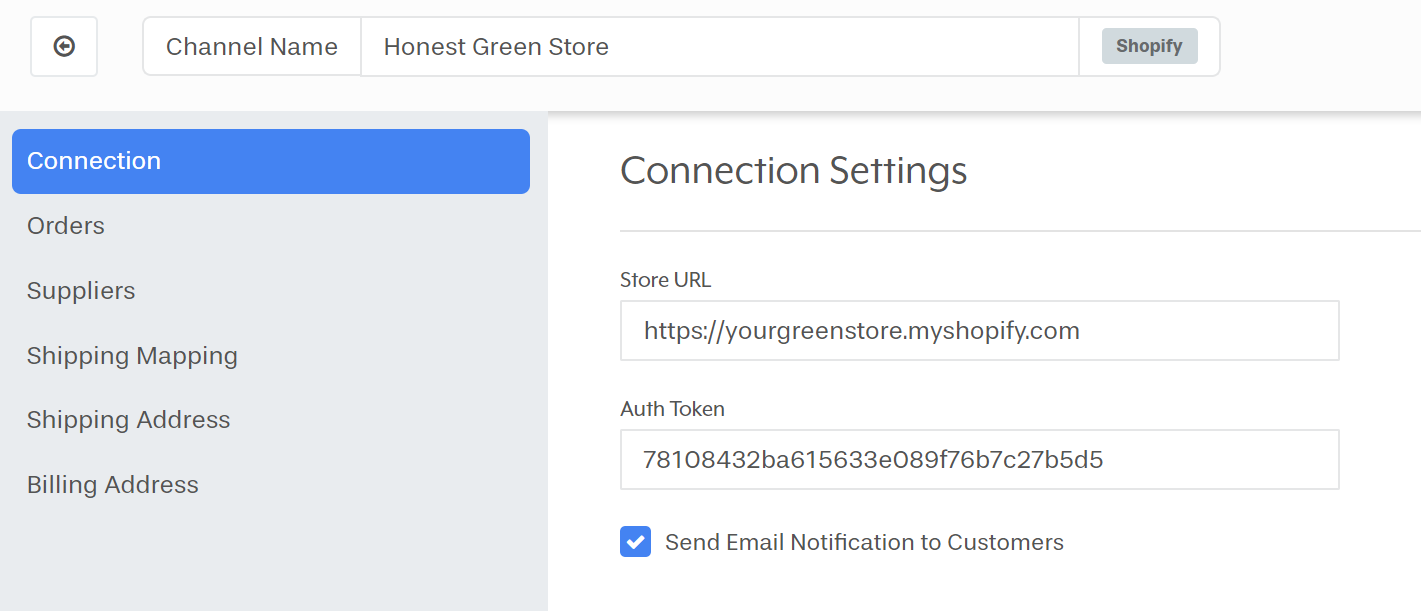
Each section of the advanced options will configure a different section of the channel; with the first four: Connection, Orders, Suppliers, and Shipping Mapping being the most important.
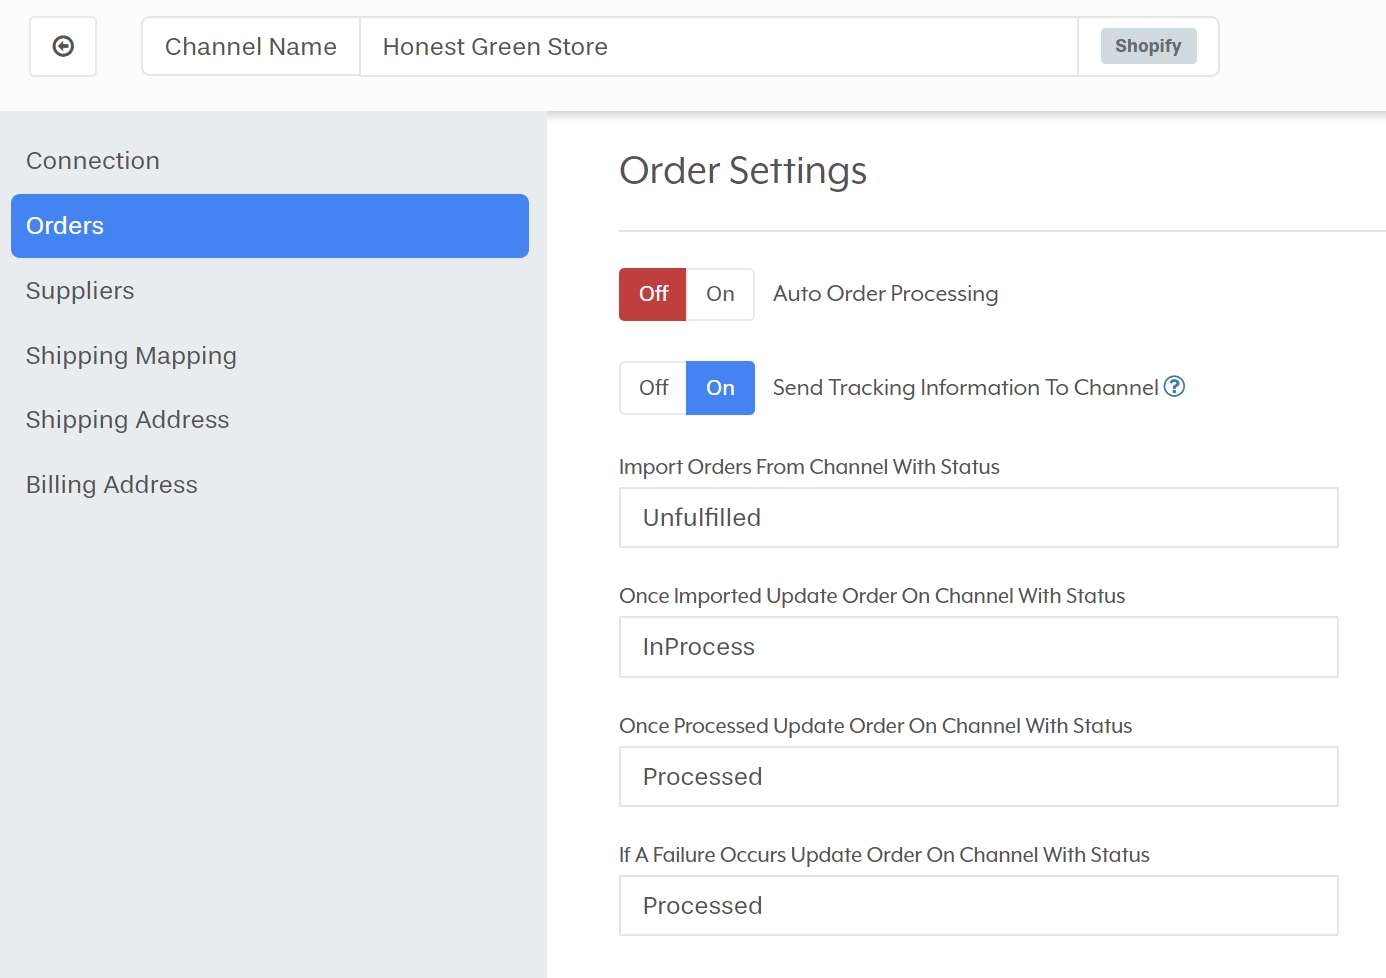
In sequential order, these options configure:
Whether or not the order is automatically processed when it comes into the Order Manager.
If tracking information is sent to your customer when orders are shipped.
What status does an order need to be in to import that order into our system?
When we import the order, what status do we update for the order on the platform?
Same as above, but after processing has completed
If all products on an order are unable to be shipped, what status do we update the order with on the platform?
(Fields 4-7 are configured in onboarding)
Shipping Mapping
Shipping mapping refers to how orders are routed based on your available suppliers, the available methods on your online store, and the shipping methods available for your supplier.
For the example below, the available suppliers are RSR Group and US Direct, the Shipping Method chosen for deliveries are UPS and USPS , and the available methods on your online store are Ground and Priority respectively.
For the sake of clarity, as the verbiage is very similar, I’ll define the “Channel Shipping Method” as, “What is this shipping option called on my store?” and the “Shipping Method” as, “How does the package arrive to my customer?”
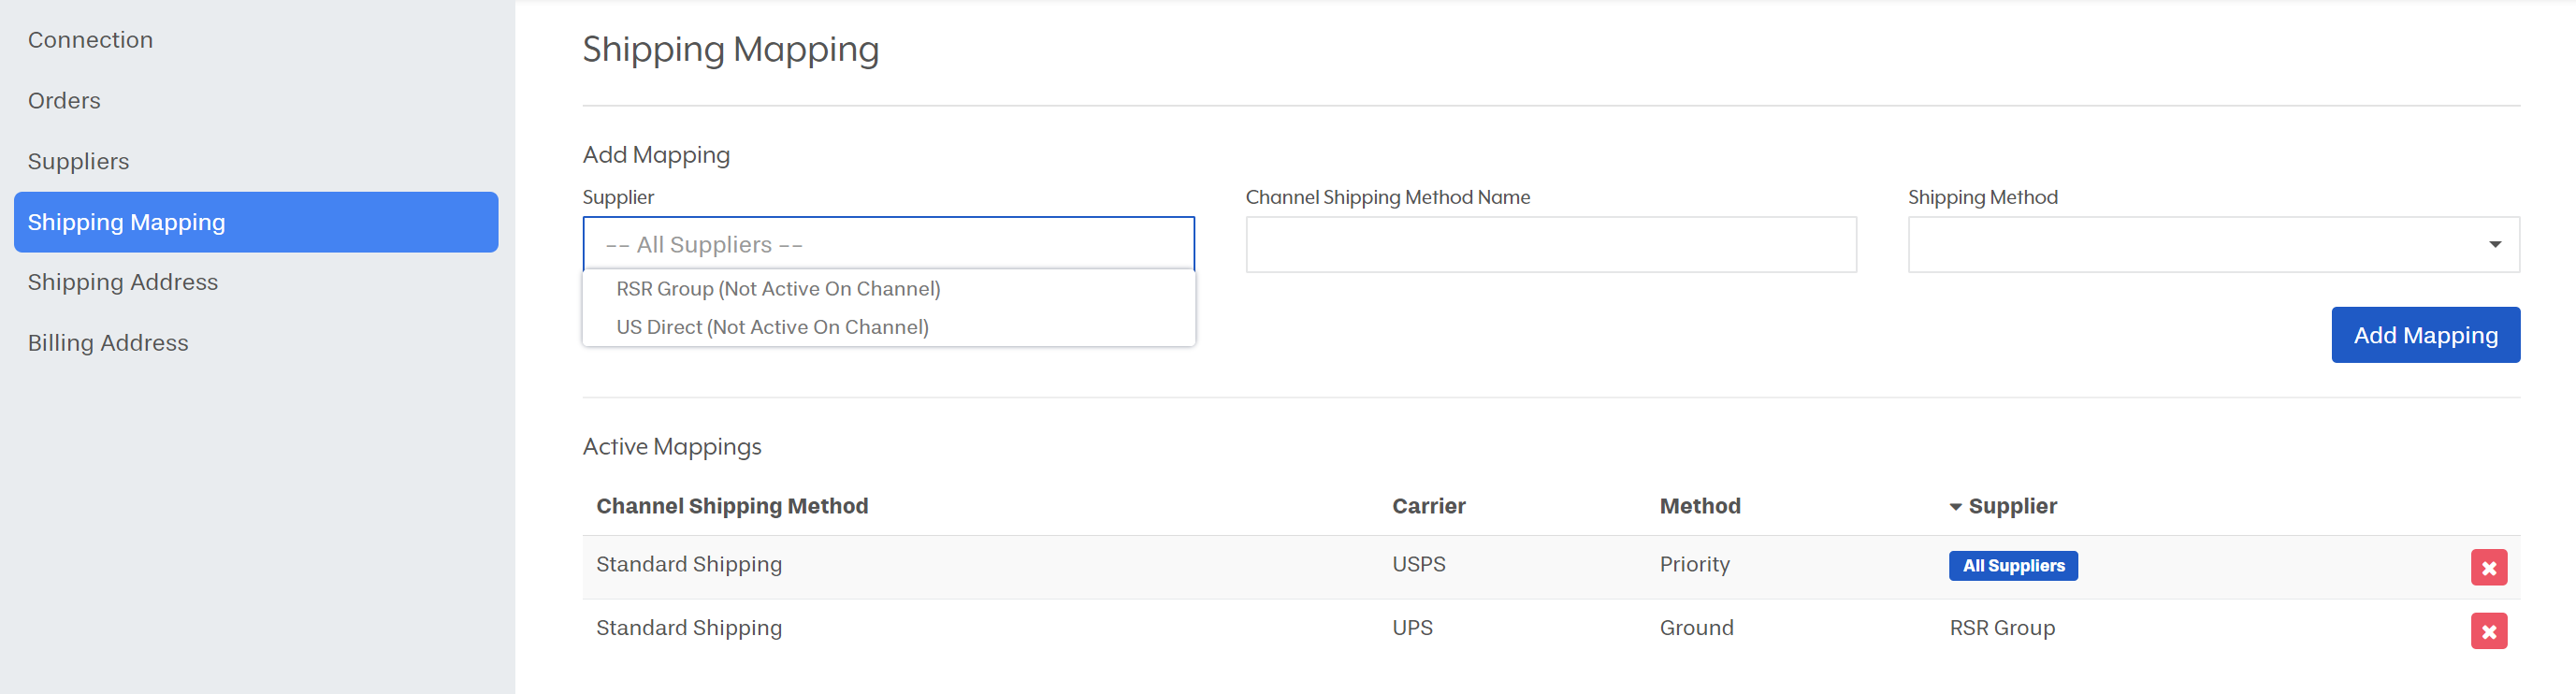
A good hypothetical situation for online stores is the notion of “Order X worth of products to receive free shipping”. In this scenario you would need to offer an additional “Channel Shipping Method”, perhaps named “Free Shipping” to the shipping mapping section and on your store. You would then relate this “Free Shipping”, Channel Shipping Method, to a Shipping Method. (“Free Shipping” to “UPS Ground” for example) If your store is using multiple suppliers to fulfill the “Order X worth of products” promotion, you would select “All suppliers” in the drop-down menu under “Supplier”.

Shipping Mapping is the most common issue that occurs in order manager. When the shipping mapping is not set-up properly, or you institute a new “Channel Shipping Method” on your store, but do not update your shipping mapping in IS you will receive an error when attempting to process an order that says, “A shipping mapping is not configured for this SKU”. All that needs to occur in this situation is to attach a “Shipping Method” to your “Channel Shipping Method”.
Shipping Address and Billing Address
These final two options are extremely straight-forward, and very rarely used, except in niche cases. Both do roughly the same thing. They overwrite an imported order’s Shipping Address or Billing Address.
If you would like to ship every order in a single channel to a specific Shipping Address, you would input that address into this field. Similarly, If you would like to use the same Billing Address for every order in a channel, you would input that address into this field.
A possible use-case for these fields, would be if you are using a freight forwarder. If you use a supplier that does not ship outside of the United States. You would use this feature to send these shipments to your freight forwarder so they would be able to ship your products internationally.

Suppliers
The Suppliers tab configures your connection with your supplier. Depending on your supplier’s requirements, this may be FTP credentials, an API Key, or information related to your account with the supplier, such as an Account Number.
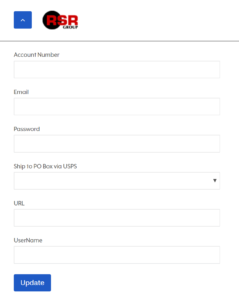
In this example, FragranceX requires an API Access ID, and API Access Key, the phone number related to your account, and confirmation that the products are being fulfilled via dropship.
All of this should be filled out by onboarding during the configuration of your order manager. However, in rare instances, such as a supplier swap, these may not be filled out as we did not have these credentials at the time of your new integration’s onboarding.
If you are receiving a general error, or non-specific error regarding processing an order, you may want to check this section to see if your supplier credentials are correct.
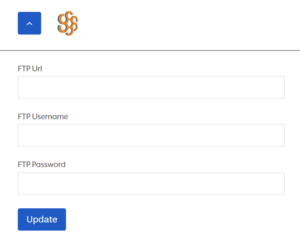
And, another example of a potential supplier order configuration, this time using FTP credentials.
Chapter List
Chapter 1:
Getting Started
Chapter 2:
Add Integration
Chapter 3:
Supplier Directory
Chapter 4: