Ultimate Guide to Inventory Source
Chapter 4: Integrations

Inventory Source Integrations
Check out these in-depth videos covering our Catalog Manager and integrations in general.
The integrations tab is where most people will spend the majority of their time. This is the section of the dashboard that allows you to select products, customize products, recategorize products, and do all of the other things that you would want to do to manage the products on your website.
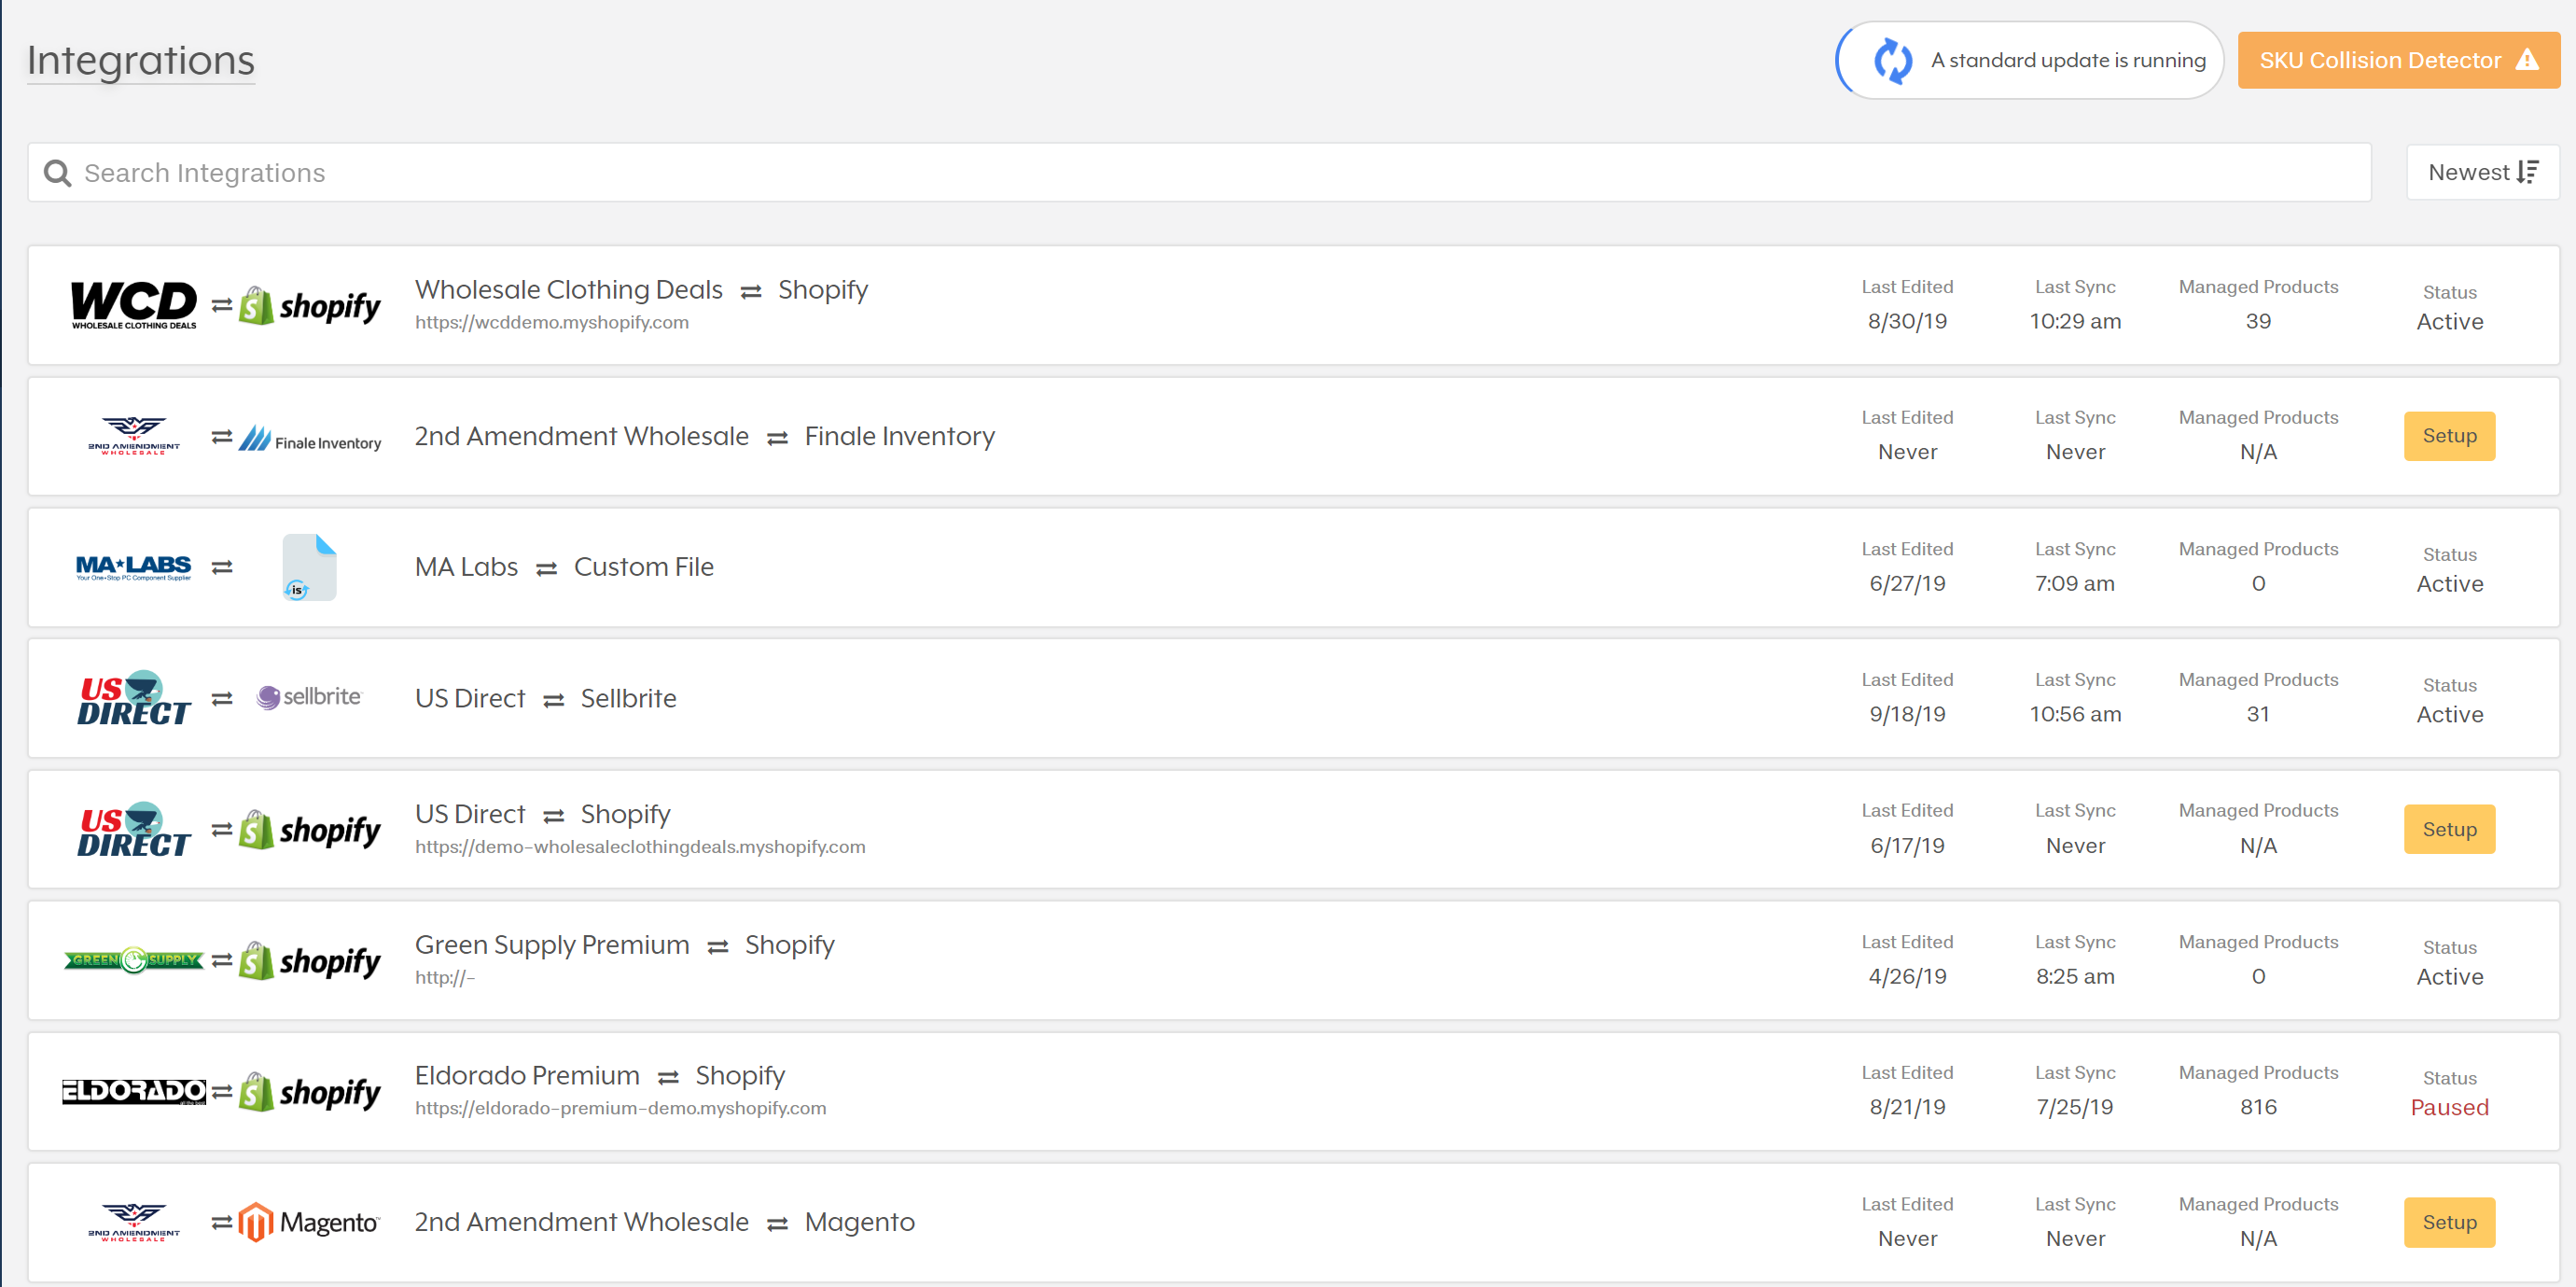
These three banners indicate which integrations are currently available to you. Clicking each will show you the Supplier Feed, Product Queue, and Store Catalog.
These three sections provide easy to use functionality in our dashboard.
Also on this screen, you can see two buttons in the top right-hand corner, that will help you manage your inventories. One for running an on-demand update, and one for managing potential duplicate SKUs between suppliers.

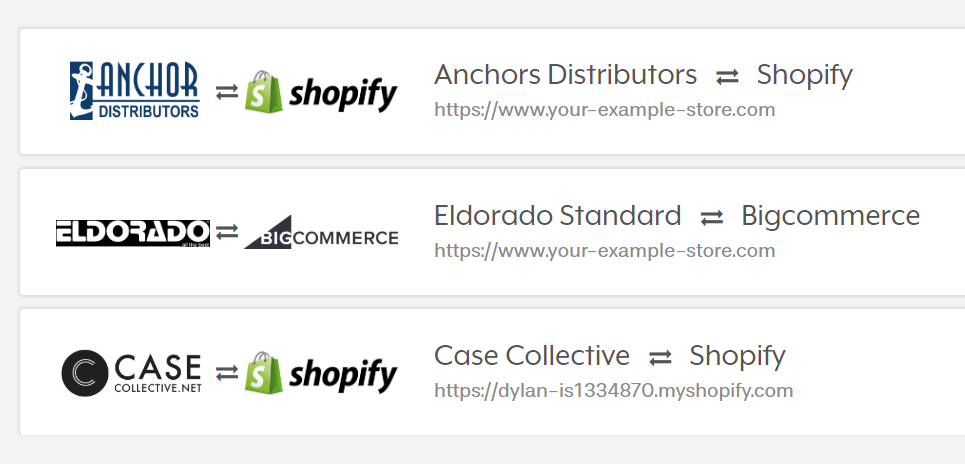
Upon clicking an integration banner, you will be taken to the Catalog Manager screen.
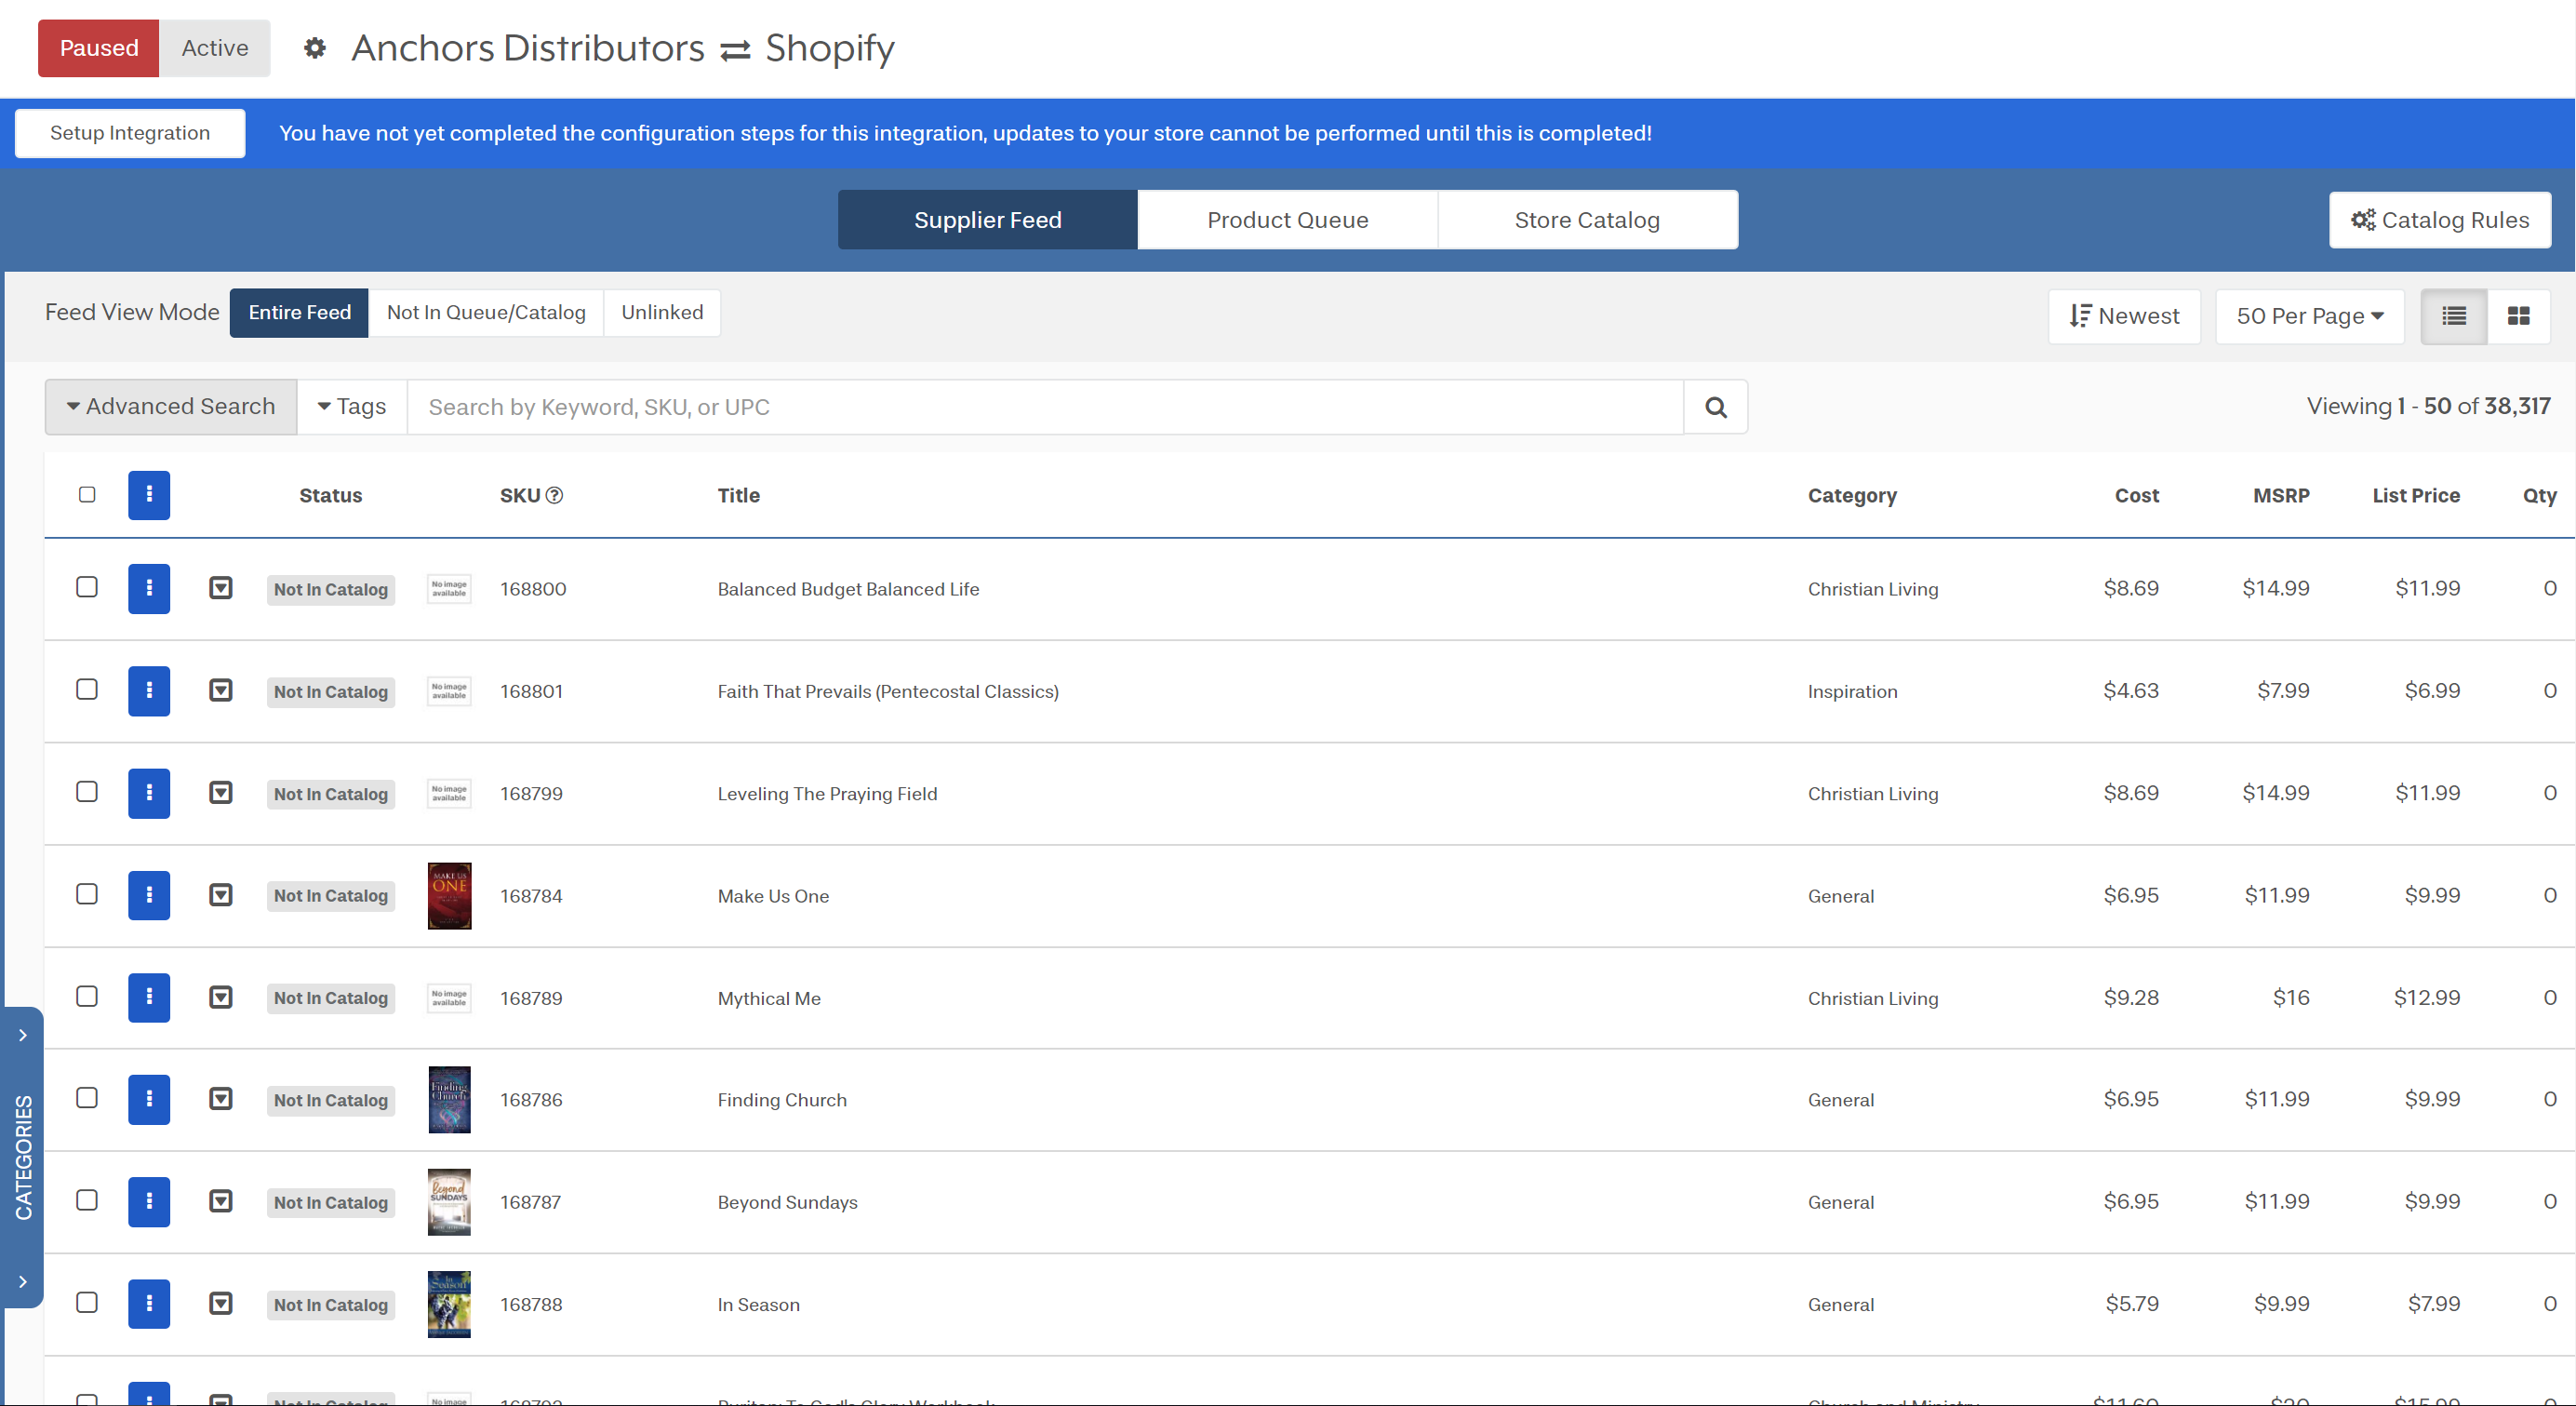
This screen is where the majority of our customers find value in working with Inventory Source. We provide all of a product’s information in an easy-to-use format that helps you make decisions that will affect your business.
The Catalog Manager is divided into three primary sections which you can see at the top of the screen.

The Supplier Feed is a complete list of all products available to you from their respective supplier. This includes out of stock and in-stock products. Suppliers tend to have upwards of 10k products in their supplier feed, and it can be daunting for new users when they first see it.
The Product Queue is the main staging area for products in the Inventory Source Dashboard. In the Product Queue, you’re given the ability to customize selected items. You can choose to customize the products or leave them alone.
The Store Catalog is where products sit when they are ready to be “active” on your selling platform. These products need to remain in the store catalog in order to receive updates during platform syncs. The Catalog is the catalyst for pushing products to the store and delivers the most “tangible” functionality in our tool.
While all three sections are extremely important to a functioning ecommerce store, the Product Queue is best used for changing individual product data.
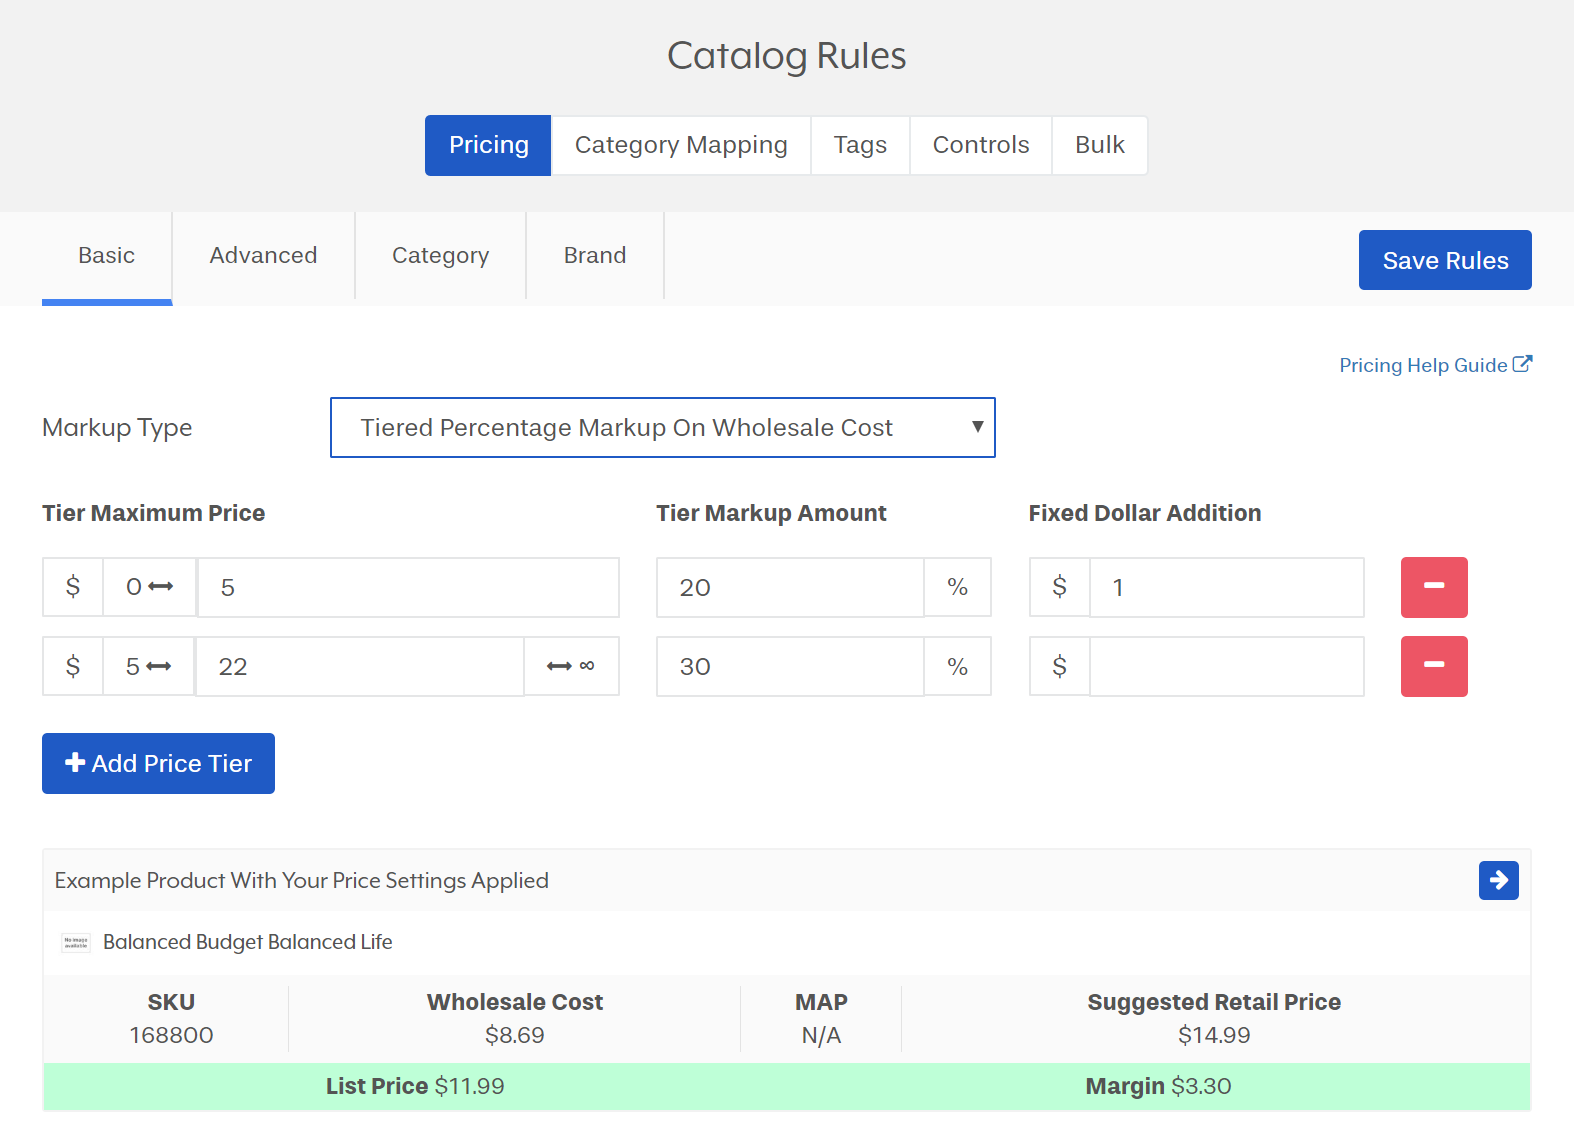
Another key feature of the IS dashboard is our impressive selection of catalog rules and tools. These rules and tools will cover all aspects of the integration.
Whether it’s pricing, categorization, shipping costs, searchability, or exporting/importing a spreadsheet of current products on the store, the Catalog Rules section is extremely valuable in making IS worthwhile for you.
Pricing
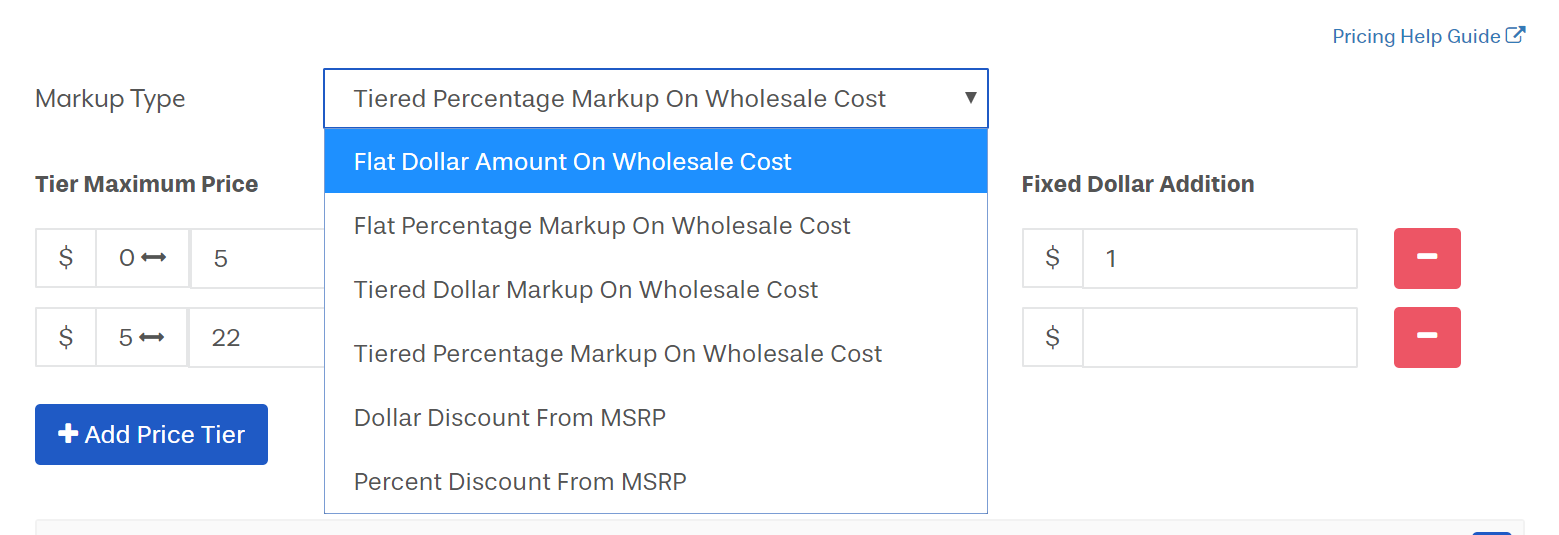
Our pricing tools allow for 6 different markup/markdown settings. These are based on either the wholesale cost or MSRP. The most common one we see is “Tiered Percentage Markup on Wholesale Cost” as it allows for the most flexibility in pricing strategies. However, just because it is the most popular doesn’t mean that it is the most effective for everyone. Many high-tier customers use just a basic markup and are wildly successful with it. Building your store’s brand is extremely important.

Moving forward into more advanced settings, we allow customers to set rules that will help manage large amounts of inventory. For example, the MSRP and MAP tools both assist when ‘fixing’ the basic pricing settings.
The MSRP tool will do exactly what it says, keep every product priced AT or BELOW MSRP. The MAP tool will alter the price of a product so the product does not drop lower than the supplier provided MAP price. Keep in mind, the MAP tool will only work if the supplier is providing us with MAP information for a product.
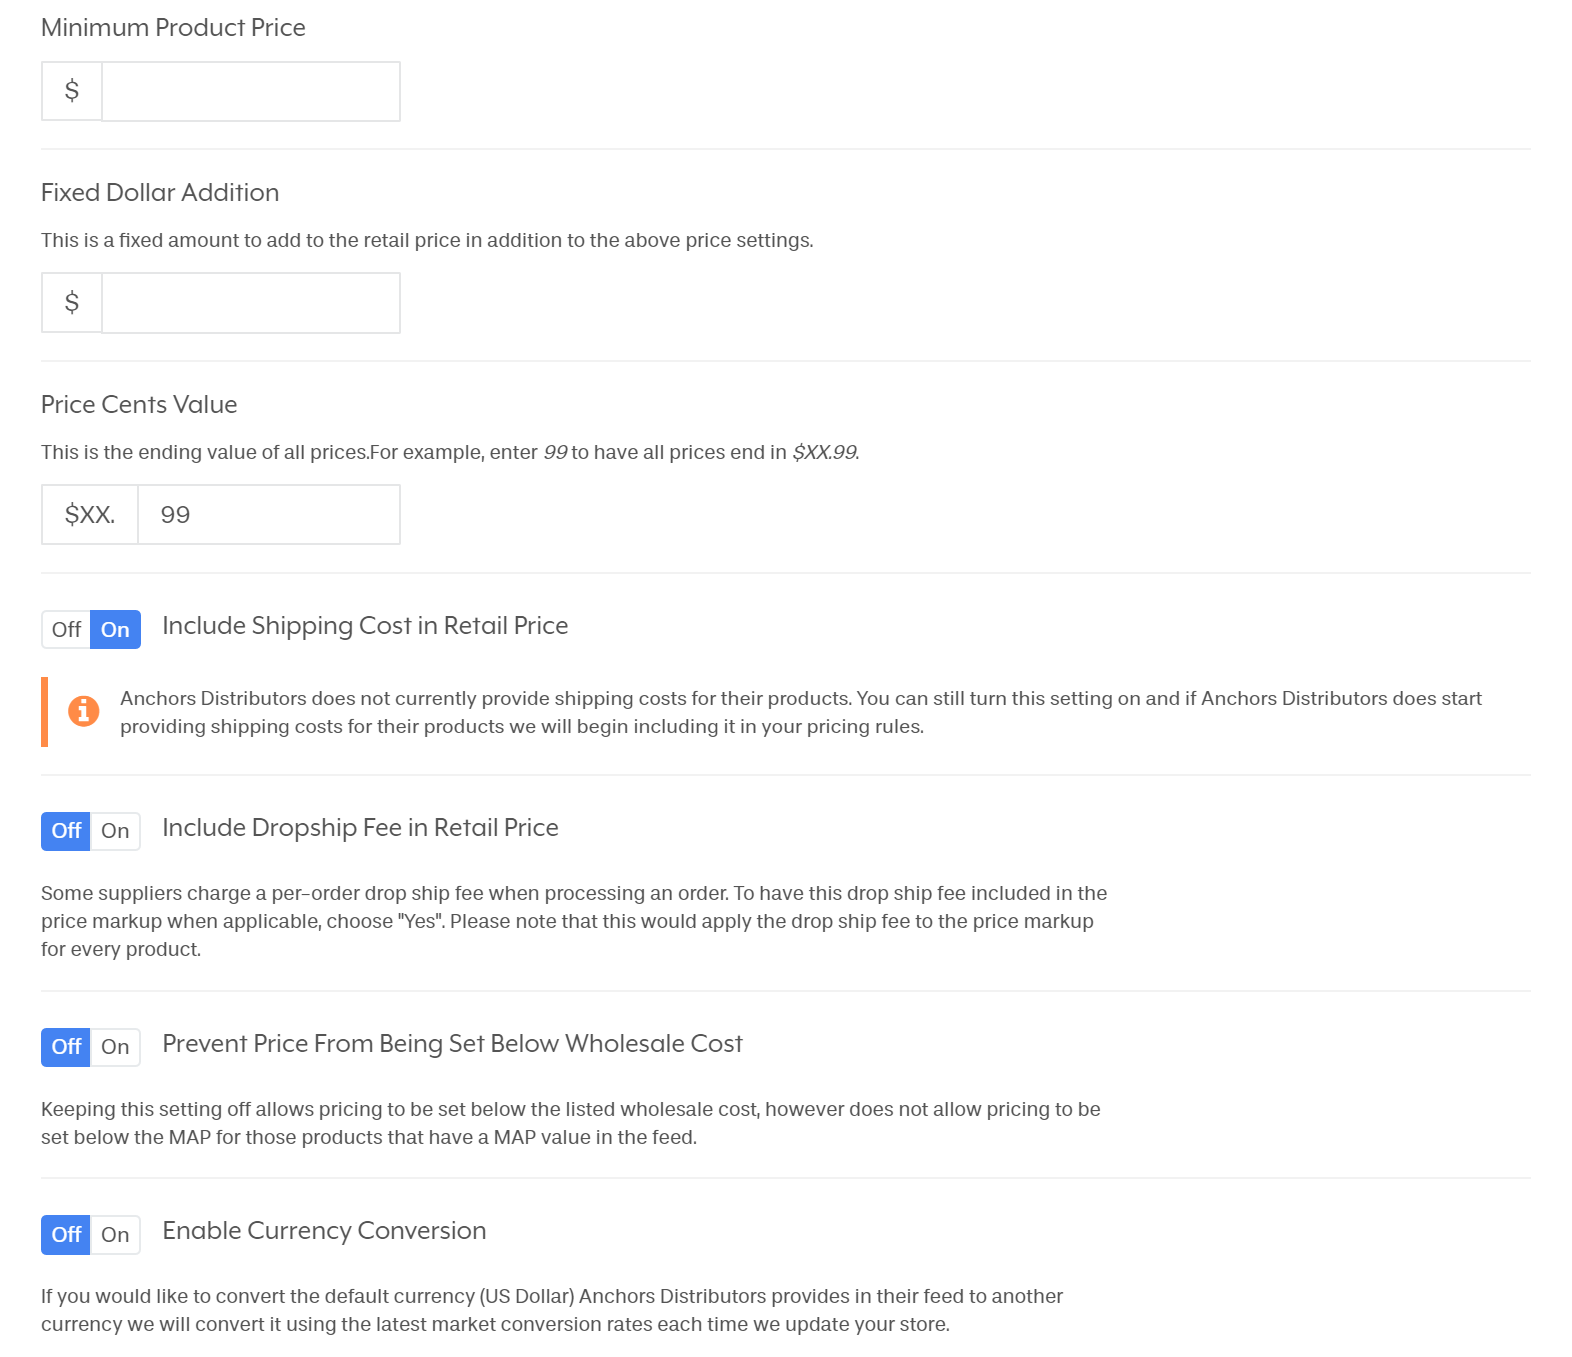
Minimum Product Price: No product can be posted below the price set here. If it is listed lower in your dashboard, the price will default to what you put here.
Fixed Dollar Addition: All products will have “X” amount added to their listing price.
Price Cents Value: The cents value for all listed products will equal, “.XX”, most commonly .99 or .95
Include Shipping Cost in Retail Price: If the supplier is providing us the shipping cost for products, that cost will be added to the listing price for the product.
Include Dropship Fee in Retail Price: If the supplier provides us the dropship fee, that fee will be added to the retail price for the product.
Prevent Price from Being Set Below Wholesale Cost: The cost of all products will never drop below the wholesale cost.
Enable Currency Conversion: The software will alter the listing to show in one of 9 currencies: USD, Canadian Dollar, British Pound, South African Rand, Euro, Australian Dollar, Nigerian Naira, UAE Dirham, and the Polish Ztoty.

Along with advanced options, you can set brand and category specific pricing. These prices will always take precedence over the default pricing options. The only exception is the “Change Price” manual override tool.
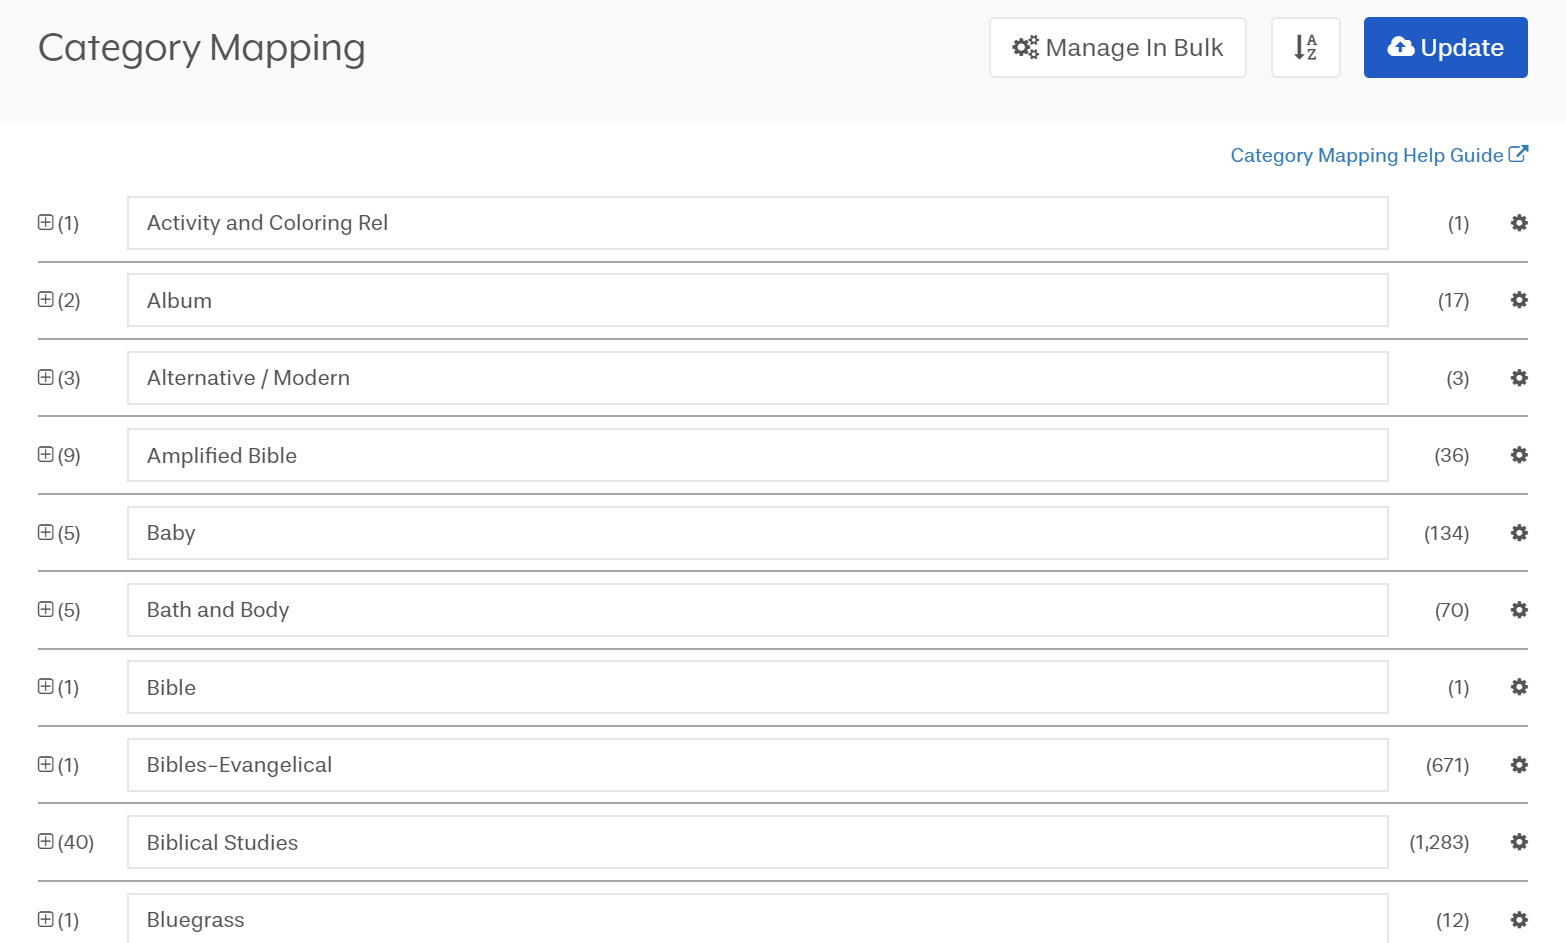
Category Mapping
Category mapping tends to be one of the trickier aspects of our tool for new users.
Generally you know what categories you want on your website, and we provide categorization based on “Parent” “Child” and occasionally “Grandparent” categories.
The basic layout of the Category Mapping section is a tiered category structure. To the right, you can see the list of “Parent” categories, each with a small number to their left denoting the number of “Child” categories under them.
Both the Child and Parent categories can be renamed to be combined; for example, renaming all of the categories to “Activity and Coloring Rel” will combine all of the categories and Child categories into one large category named “Activity and Coloring Rel” that contains all of the subcategories of every other Parent Category.
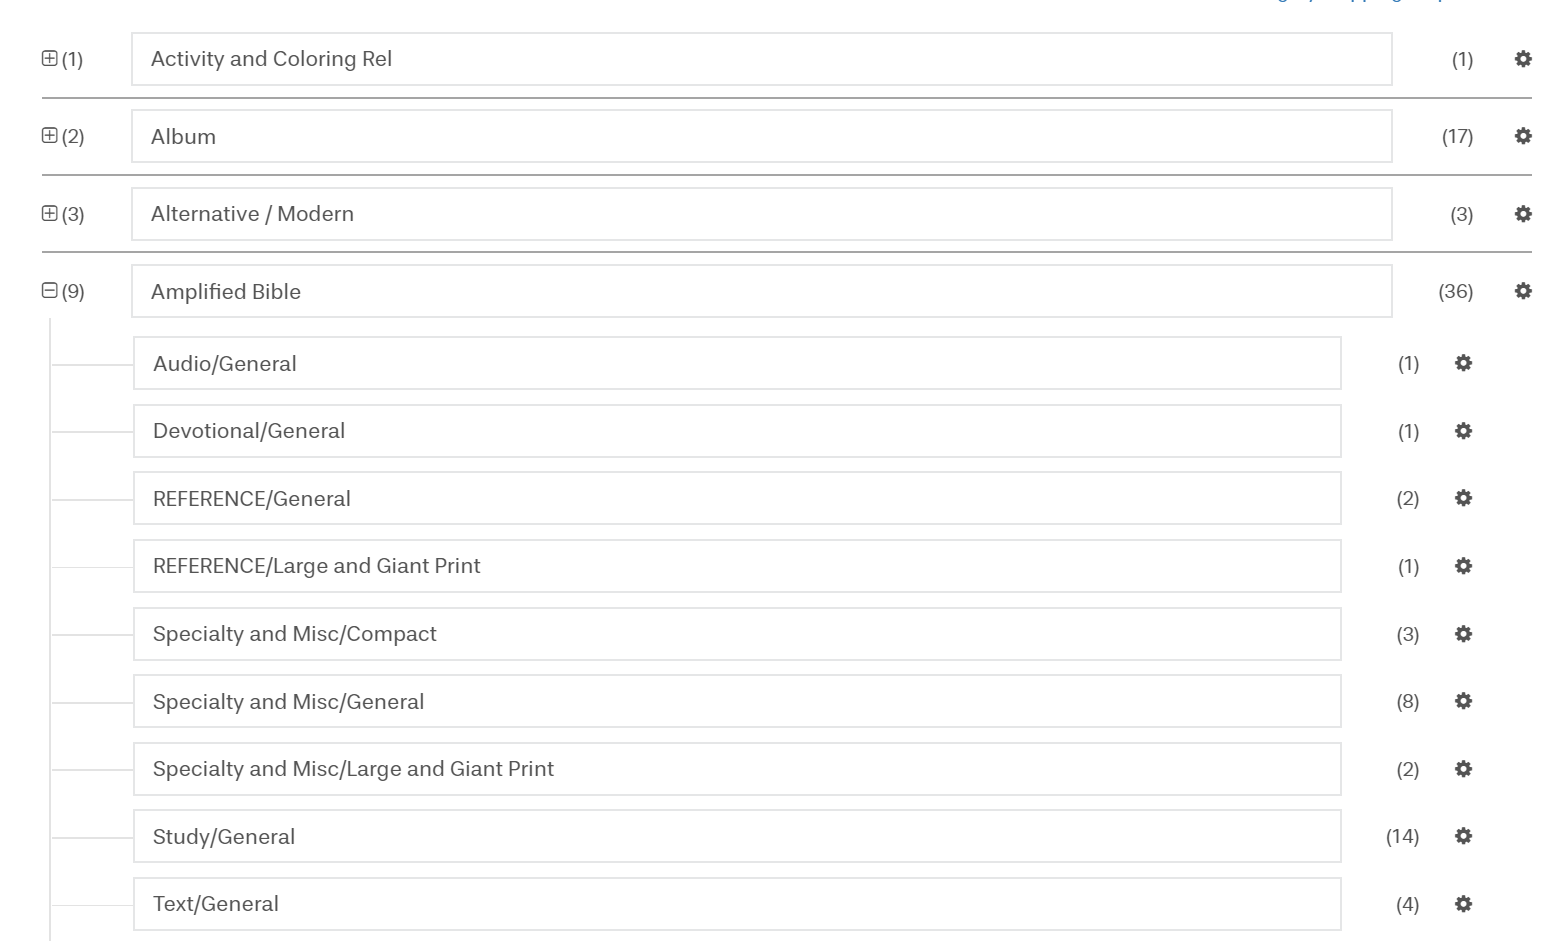
Clicking on the small “+” to the left of the parent categories will show all of the Child categories currently listed under that parent category. In a similar manner to the Parent category combinations, if all of the Child categories were renamed “Audio/General” all of the products under these child categories would be placed under a single Child category called “Audio/General” on your website.
Keep in mind, when changing the titles of these Child and Parent categories to combine them, they must be identical. Even a single difference in case, space, or wording will cause them to form two separate categories.
I would advise most people to get these categories loaded onto their website as close as they can to what they want. If your store requires a 4-tier category structure, that will need to be configured on your website.
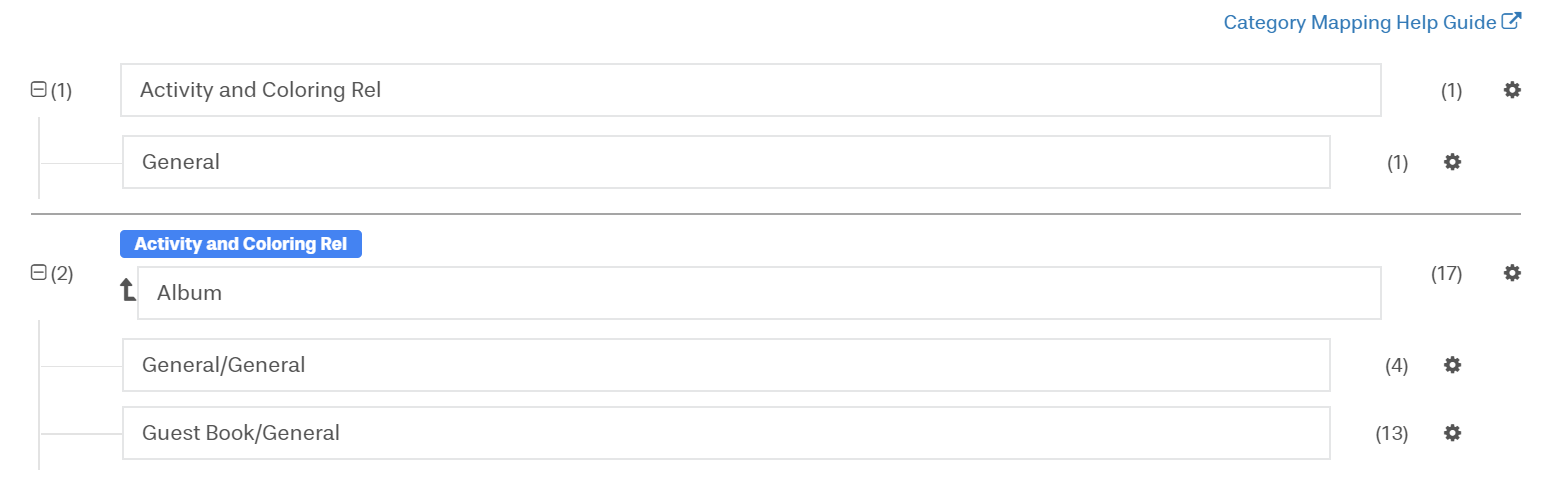
In addition to category merging, we can assign a new Parent category to Child categories, or put a Parent category under another Parent category. It will show the change in a small blue box over either the Parent category or the Child category in question.
In the example to the right, “Album” has been placed under “Activity and Coloring Rel” creating the following structure.
- Parent Category: Activity and Coloring Rel
- Child Category: Album
- Grandchild Category: General/General, Guest Book/General, General
- Child Category: Album
This in essence creates a three tiered category structure. Please note, that the Child categories from both Parent categories will populate in the new set-up.
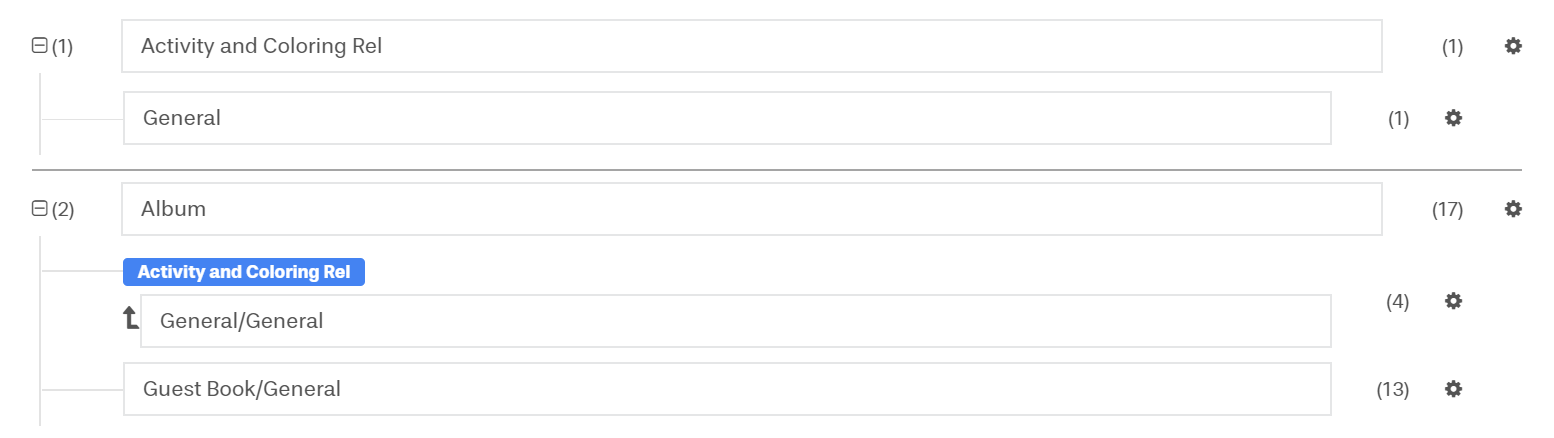
In a similar situation, you can alter which Parent category a Child category belongs to.
In the example to the left, the child category “General/General”under the parent category “Album” has been moved to the “Activity and Coloring Rel” Parent Category. This would populate on the website as:
- Parent Category: Activity and Coloring Rel
- Child Category: General, General/General
- Parent Category: Album
- Child Category: Guest Book/General

Product Tags
Product tags are used to easily sort through and “tag” the products that fit certain specifications that you set.
These tags will not appear anywhere outside of the Inventory Source Dashboard, they are often confused with Shopify Tags but have no relation.
Tags are established through multiple filters.
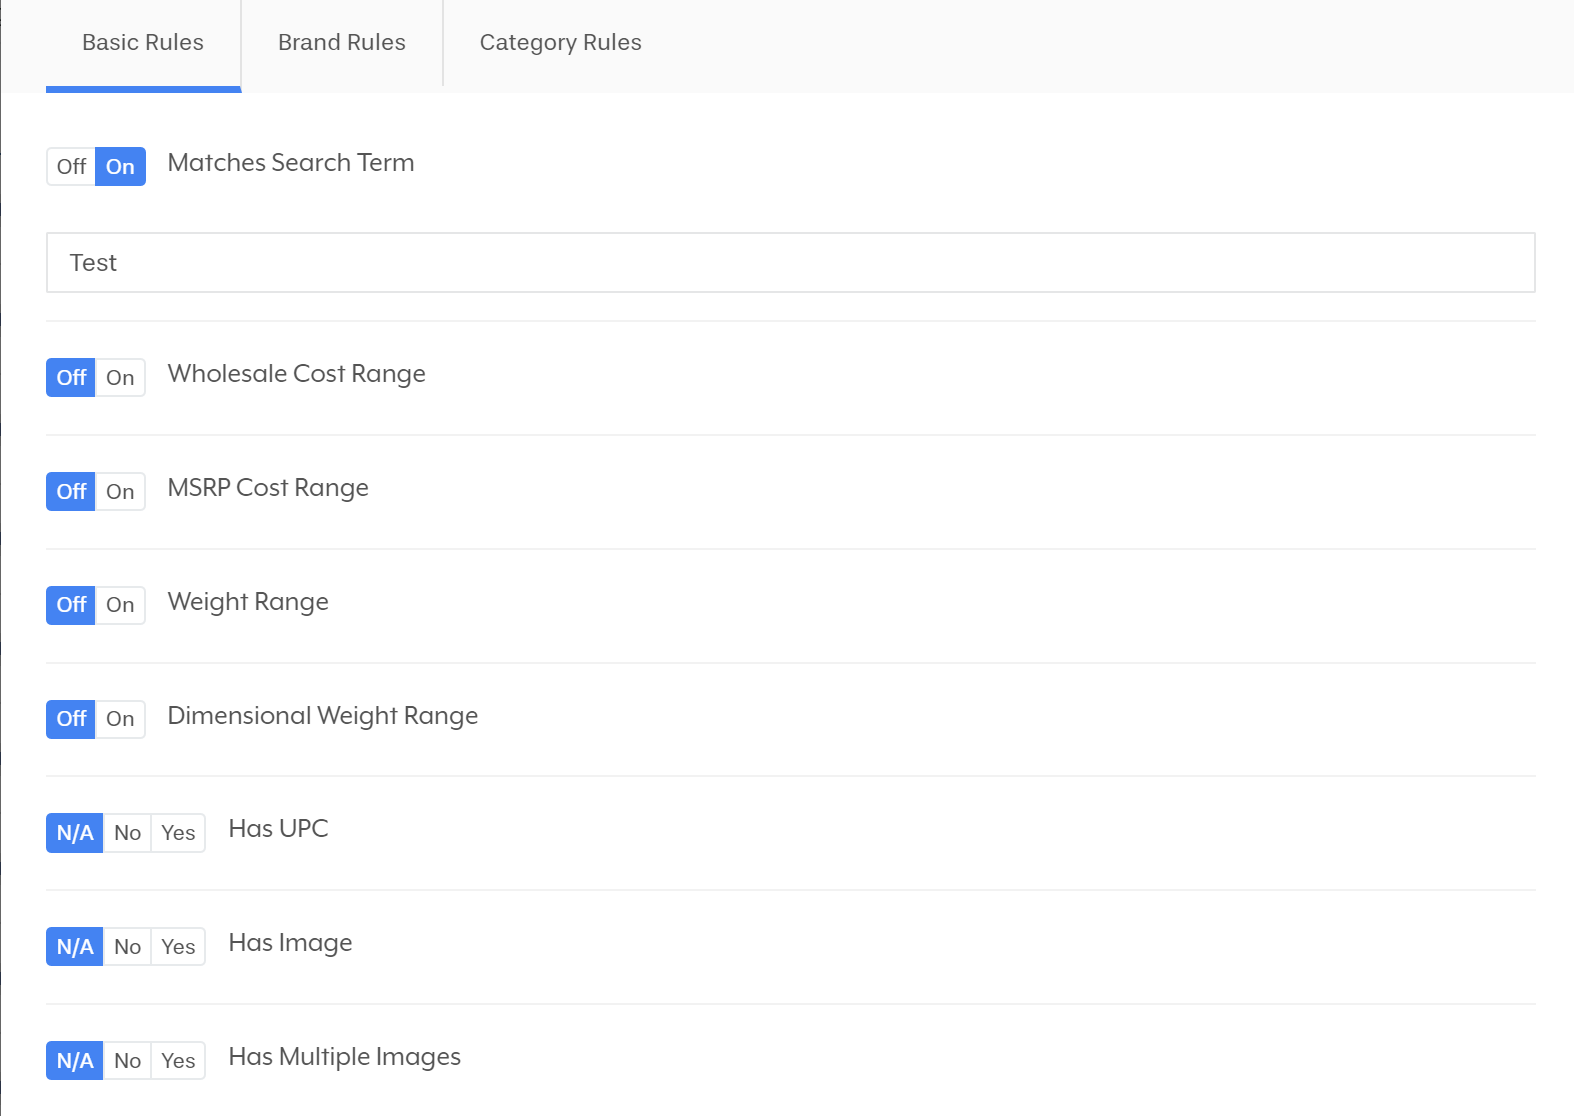
You will name your tag and then create filters for products that you would like to assign this tag to.
For example, you might want only products with the term “Organic” in their description or title, so they would click “On” Matches search term and type in “Organic”. You may also be selling on Amazon, so you will need that product to have a UPC, in this case they would have both the “Matches Search Term” and the “Has UPC” filters on.
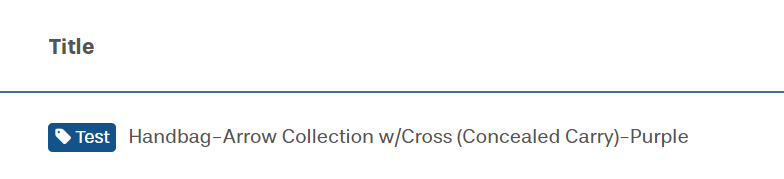
When the filters are set, the products will appear with a tag icon next to them, displaying the name of the tag they are associated with.
Controls
The controls tab is where some important options are configured. This includes how you want to handle inactive and out of stock products, at what quantity level you consider a product to be “Out of Stock”, and where you can unlink certain SKUs from our system.

We typically recommend having this set to at least 5 for most customers. Using 5 as an example, if a quantity is updated by the supplier to be <5, then that product will be marked out of stock on your website. If the product quantity sits at 6 or above, it will be counted as “In stock”.

This tool will hide out of stock products from the front-end of your store. In practice, this works in conjunction with the Minimum Quantity Filter and a product falling beneath the Minimum Quantity Filter will be affected by this tool. Please note, that a platform must have the capability to hide a product for this to work.

This tool will stop products that are marked “out of stock” from being uploaded, or will allow products that are out of stock to be uploaded, depending on the setting selected. This tool is also affected by the Minimum Quantity Filter.

This tool controls how discontinued or inactive products are treated. If a product is discontinued most customers will want that product to be removed from their storefront.

This setting allows you to select specific SKUs for us to stop managing. This is used in edge-cases and can help some people when your trying to manage products when you have physical and dropship inventory.
Bulk
The bulk tools are useful for anyone making massive changes to a massive amount of products.
The tool that most people will find useful is the “Create Export” feature this creates a .csv document of all the current products listed in your catalog. This can be used as a good template, as all of our upload features require the SKU to be in the first column. The “Create Export” feature gives all of the product data of each product in the catalog and allows you to edit this information.
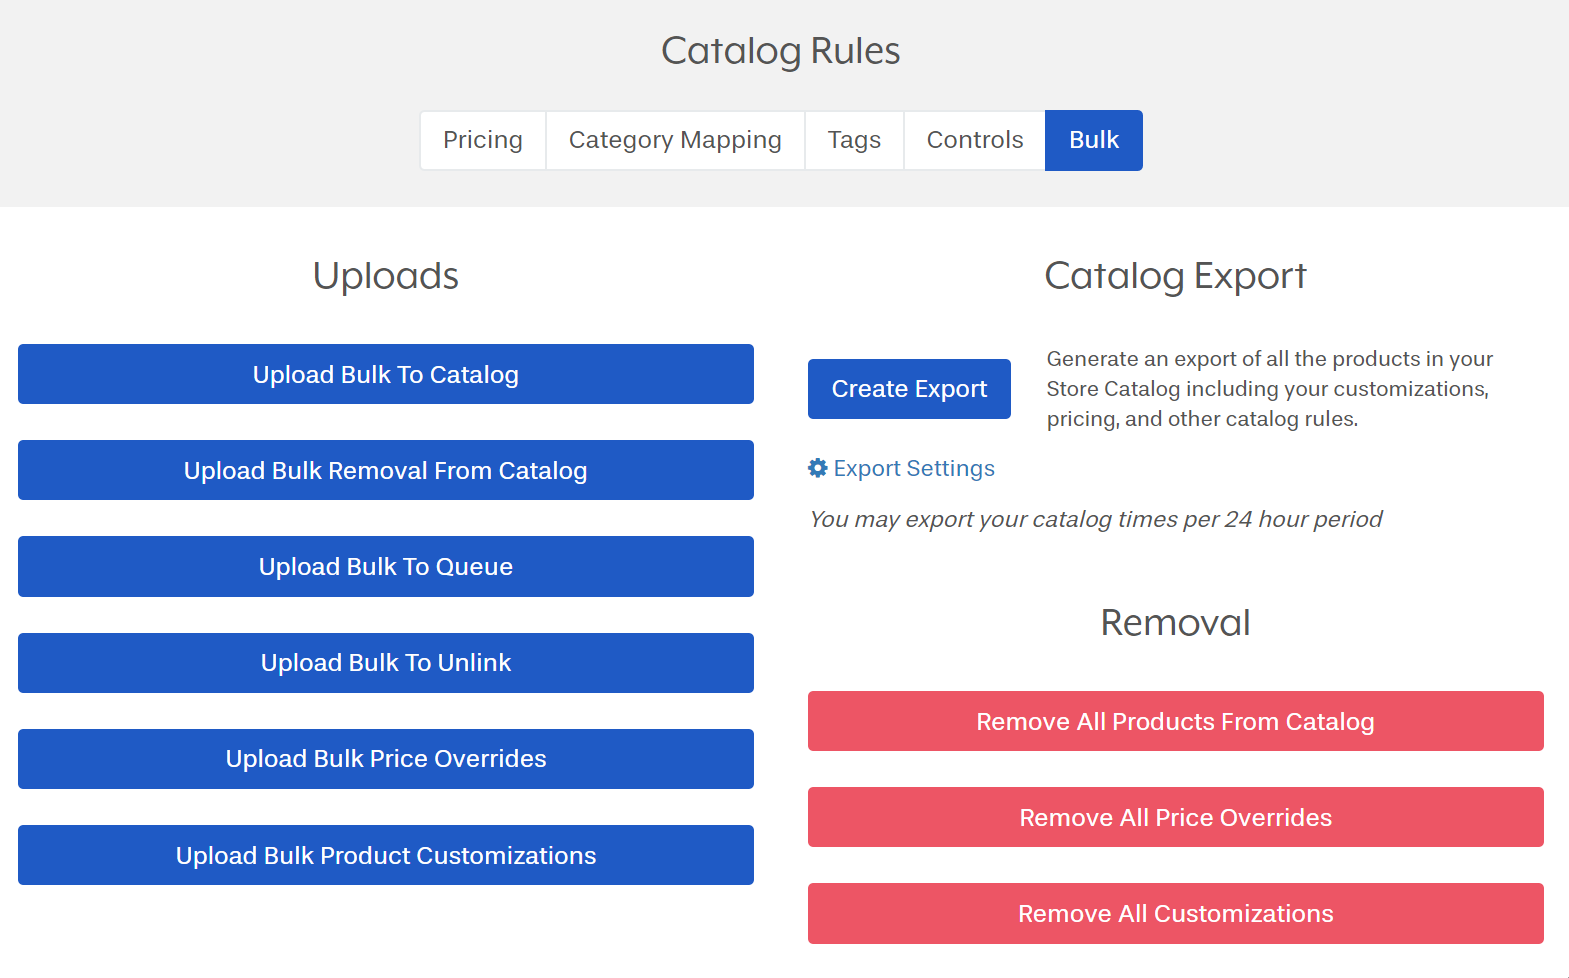
Each of the available tools (above) allow you to do the following things:
Upload Bulk to Catalog: This feature uploads a list of SKUs to the catalog. This can be useful for someone managing a large catalog and knowing which SKUs they need. It’ll save them the trouble of searching up each SKU individually or with filters in our dashboard.
Upload Bulk Removal from Catalog: This feature does the exact opposite of the previous feature. This will remove any listed SKU from the catalog in the uploaded file.
Upload Bulk to Queue: This is the same as Upload Bulk to Catalog, but will place the SKUs in the Queue.
Upload Bulk Price Overrides: This will change the price of any SKU listed in column 1, to whatever is listed under the second column, “Price”, on the spreadsheet. This is more customizable than assigning traditional pricing rules, but will take extra effort.
Upload Bulk Product Customizations: This feature will allow you to upload any of the alterations you’ve made to the “Create Export” file. The accepted fields are provided by the tool, and SKU must remain in the first column. This tool covers Title, description, UPC, ISBN, ASIN, manufacturer, weight, length, height, width, and manufacturer ID.
Chapter List
Chapter 1:
Getting Started
Chapter 2:
Add Integration
Chapter 3:
Supplier Directory
Chapter 4: